deploying your blazor wasm app to heroku
by Eric Thomas D. Cabigting

Prerequisite:
- Heroku account
- A working Blazor WebAssembly App
- Command line either Bash or PS
Here are the steps to follow:
- Make sure you are inside your Blazor App project
- Login to Heroku using the CLI with the following command:
Terminal
heroku loginheroku login- Next create a Heroku APP with the following command:
Terminal
heroku create <your-app-name>heroku create <your-app-name>- Next is to set the buildpack for your app:
heroku buildpacks:set https://github.com/heroku/heroku-buildpack-static -a <your-app-id>heroku buildpacks:set https://github.com/heroku/heroku-buildpack-static -a <your-app-id>- Install the heroku static cli for your app with following command:
heroku plugins:install heroku-cli-staticheroku plugins:install heroku-cli-static- The next step is to initialize the `static.json` with the following command and answer to the following questions:
heroku static:init
# Enter the directory of your app:      release/wwwroot
# Drop `.html` extensions from urls?:   Yes
# Patch to custom error page from root directory: index.html
heroku static:init
# Enter the directory of your app: release/wwwroot
# Drop `.html` extensions from urls?: Yes
# Patch to custom error page from root directory: index.htmlThe code above generated a new file called `static.json` in your root folder. It contains the following json:"
JSON
{
  "root": "release/wwwroot",
  "clean_urls": true,
  "error_page": "index.html"
}
{
"root": "release/wwwroot",
"clean_urls": true,
"error_page": "index.html"
}After the steps from above your Heroku app is now configured. Next is to push your code to heroku.
- While inside your root project directory run the following command to publish the app
dotnet publish -c Release -o releasedotnet publish -c Release -o releaseThe code above created a new folder in your root called `release` which contains all compiled codes
- Next is to push the code to heroku with the following code:
heroku static:deploy -a <your-app-name>heroku static:deploy -a <your-app-name>In my case my app is called yetanotherblazorapp. You should see something like the following in your terminal/command-line:
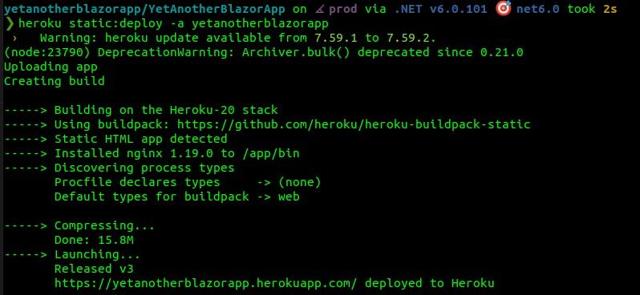
Thats it! Your app is live in heroku!
Disclaimer: All content reflects my personal views only and does not represent the positions, strategies, or opinions of any entity I am or have been associated with.