Enabling WSL2 to be Accessible in the Host Network

Windows Subsystem for Linux (WSL) has become an essential tool for developers and system administrators who want to run Linux distributions directly on Windows. With WSL2, you get a full Linux kernel and improved performance, but accessing WSL2 applications from the host network can be a bit tricky. In this post, we will walk through the steps to enable WSL2 to be accessible in the host network.
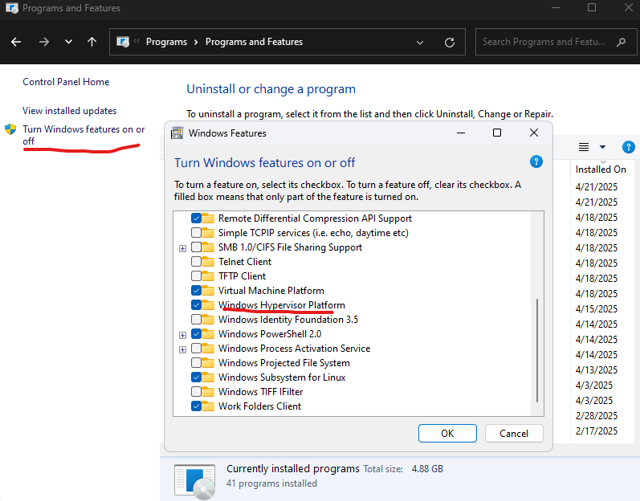
Step 1: Enable Hyper-V from Windows Features Control Panel
The first step in enabling WSL2 networking capabilities is to ensure that Hyper-V is enabled on your Windows machine. Hyper-V is a virtualization technology that allows you to run virtual machines on Windows. WSL2 relies on Hyper-V to function properly.
How to Enable Hyper-V:
- Press Windows + R to open the Run dialog.
- Type optionalfeatures and hit Enter. This will open the Windows Features dialog.
- In the Windows Features dialog, scroll down and find "Hyper-V."
- Check the box next to "Hyper-V" and click OK.
- Windows will install the necessary components. You may need to restart your computer to complete the installation.
Step 2: Update .wslconfig to Enable Mirrored Networking Mode
The next step is to configure WSL2 to use mirrored networking mode. This allows WSL2 to share the host's network interface, making it accessible from the host network.
How to Update .wslconfig:
- Open File Explorer and navigate to C:\Users\<current user>. Replace <current user> with your actual Windows username.
- Look for a file named .wslconfig. If it doesn't exist, you can create a new text file and rename it to .wslconfig (make sure to remove the .txt extension).
- Open the .wslconfig file in a text editor (like Notepad) and add the following lines:
[wsl2]
networkingMode=mirrored[wsl2]
networkingMode=mirroredSave the file and close the text editor.
Step 3: Update Firewall Port to Enable Traffic from Specific Port
The final step is to configure the Windows Firewall to allow traffic through the specific port you want to use for your WSL2 applications. This is crucial for ensuring that your applications can communicate with the host network.
- Press Windows + R to open the Run dialog.
- Type wf.msc and hit Enter to open the Windows Defender Firewall with Advanced Security.
- In the left pane, click on "Inbound Rules."
- In the right pane, click on "New Rule."
- Select "Port" and click Next.
- Choose "TCP" or "UDP" depending on your application requirements, and specify the port number you want to open (e.g., 8080). Click Next.
- Select "Allow the connection" and click Next.
- Choose when the rule applies (Domain, Private, Public) and click Next.
- Give your rule a name (e.g., "WSL2 Port Forwarding") and click Finish.
- !! IMPORTANT: Restart your windows machine to make sure all changes are applied.
Now, your WSL2 applications should be accessible from the host network through the specified port.
Conclusion
By following these steps, you can enable WSL2 to be accessible in the host network via port forwarding. This setup allows you to run web servers, databases, and other networked applications in WSL2 while making them accessible from your Windows host.
Disclaimer: All content reflects my personal views only and does not represent the positions, strategies, or opinions of any entity I am or have been associated with.